Wednesday, February 27, 2013

No good, lousy rotten day.. then Rice and Kielbasa!

Well, I'm having a rotten day. It happens. For me, today, this means pain. It wasn't all day, thankfully, but it has decided that this late afternoon/early evening was the perfect time to flare up. Joy. I'm having an emotionally painful day as well. That also happens, and is to be expected right now while dealing with the additional stress of unemployment as we wait, and wait, and wait some more for the call back from any of the jobs hubby has applied for and our meager funds slowly fade away... on top of all the normal, every day stress of life in Alaska in winter, teenagers, crazy dogs, infertility (a big one..) and waiting for the next foster care call..
ring, darn you! ring!!

Things have been fairly hectic this week anyway. Hubby had a dental appointment this week (quick before the insurance ends!) and found out he has a cracked tooth and needs a crown. My hand is healing nicely, for the most part. There is one finger that might have some lasting nerve damage done, but it seems to be of the sort that, if it is permanently damaged, it will just tingle a bit. Kind of like when you sit on your foot for a while and cut off circulation a little.. not too bad a deal. But, still too early to know.

And I am still working on a nice long post about cast iron cookware. I might have to break it up into 2 parts, even. Right now I'm waiting on the dealing with a bad case of rust portion of the post as hubby was going to lend his assistance with some tools, but he's had appointments this week, so it hasn't happened yet. but soon.. very soon...  I will at least get the first part up if not the whole thing.

Anyway, things have been crazy and I haven't had too much time to do any "fancy" cooking, as hubby would call it. Last night for dinner, we cubed up some potatoes, sliced some onions and threw them in the skillet with some ground beef and called it good.
Tonight, I will be showing you one of my rice cooker dishes. It's really simple and it's about all I'm up for tonight. I will be doing some more experimental baking over the next few days though, as I've been asked to do some gluten free bites for a friend's house warming party this weekend.

This is our Kikkoman. He's a large Pommie mix.
Of course, tonight, even this simple meal gave me some problems when the silly bag the veggies were in decided it wasn't as sealed as I thought it was when I went to put it back in the freezer and frozen veggies scattered all over my kitchen floor. *sigh* Kikkoman was the only dog to come investigate, so clean up wasn't as difficult as it could have been if all 4 of them had come running. He decided frozen veggies were too cold and hard for him today.


So for tonight's meal, you will need:
I love you, rice cooker....

*  Rice cooker (Ok, you don't need this, you could cook everything separately and combine, which is how we use to do it. But if you have one, it's so much easier, just assemble, turn on and walk away...)
* 1 kielbasa, cut into thin slices
* 3 "cups" of rice, I'm using Jasmine. (Most rice cookers come with measuring cups they want you to use. Their "cup" is usually a little bit less then a standard measuring cup)
* 2 cups or so assorted frozen veggies (more if you want more veggies in  your meal.)
* enough water to come to 3 cup line in your cooker (or to cook your items if doing so separately)
* 1 bullion cube, crumbled
* pepper, garlic, onion powder to taste. The kielbasa should add enough salt that you won't need to add any.
* about 1/4 stick of butter, dependent on family taste preference (some people may want more...)
* Worcestershire sauce, jigger or two

Dump everything into your rice cooker, turn on, and walk away.

So, so very simple. Perfect for those nights you really don't want to do much, are too busy to spend more then 5 or 10 minutes prepping for dinner.

When the cooker is done doing it's thing, then it is time to eat. Just give everything a good stir in the pot and then spoon into bowls and serve.
Hubby opted for more worcestershire sauce. Teenager ate her's plain and actually went back for seconds, and I added a splash of rice wine vinegar to mine. If there are any left overs, they will be wonderful fried up for lunch tomorrow.
Personally, I would have loved the addition of some pineapple and soy sauce, but Hubby would NOT go for that, so we go without.. maybe I'll toss some in with my left overs at lunch tomorrow...


Sunday, February 24, 2013

Chicken Ragout

Okay. I will admit that this is a recipe I've never tried before, but hubby was watching some cooking show over the weekend (there were motorcycles involved as well...) and they were doing some "rustic" dishes.
This got us talking about all sorts of things, and got me thinking about what to do for our Sunday dinner.  I have plenty of chicken in the freezer right now, so decided to pull some of that out and poked around in the pantry and decided to try making a chicken ragout.
So the first thing I did was to go online and do a search for some sample recipes. I found several, each was a little bit different. Some contained things that I would love to have added, but we either just didn't have to hand right now and/or absolutely no one else in the household would eat. I'm talking zucchini,  yellow squash, asparagus, artichokes and the like. I do have a tin of artichoke that I might be adding as a garnish to my plate, but I don't think anyone else will be doing so. I know hubby won't touch them and the few times I have tried introducing them to my youngest step daughter (aka The Teenager) she's not liked them. I've done the tinned one and freshly steamed and/or roasted. Not a big seller for her at this point, but then, I didn't develop a taste for them til later in life as well. (Honestly, not sure I was ever exposed to them younger..)
Anyway, so I got my ideas, compared them to what we had available, and this is what I've come up with. For this recipe, I will be using:

*   1 whole chicken, cut into parts (feel free to use all legs, thighs, breasts, whatever if you prefer.) Leave out the wings, gizzards, and other organs. Save them for stock later. I will be leaving the skins on, but you can remove if you would prefer.
*   A combo of olive oil and butter for frying. The mixture adds flavor and allows for a better smoke point. I will be using some of my home made garlic butter mixture, because it's another way to add more flavor.
*   A splash of burgundy or other red cooking wine. I don't use cooking wines often, but they do have their places and uses, and this is one of them.
*   about 2 or 3 carrots, sliced
*   1 can peas
*   1 small onion, sliced
*   1  can stewed tomatoes with
*   1  can diced tomatoes
*   2 tsp ginger/garlic puree
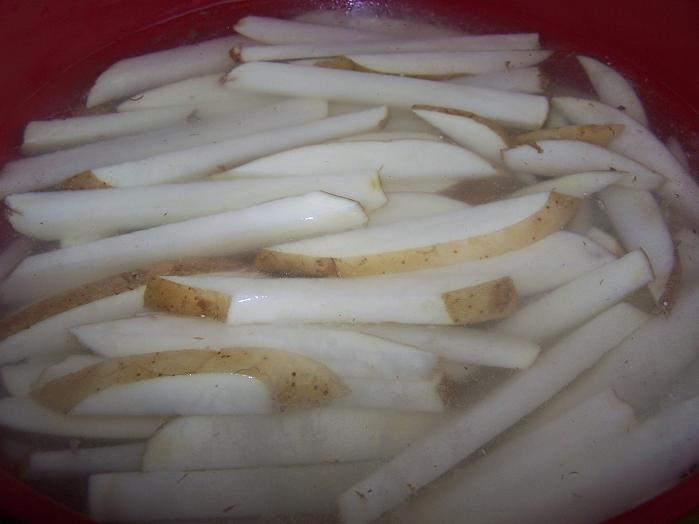
*   1  or two potatoes, diced into large chunks. I really would have loved to use some baby potatoes, red, maybe yellow, for this, but we didn't have any and I didn't want to spend $4 yesterday to pick any up when I've got large ones at home already and I can just cut them up and use those. maybe another time when the budget has more wiggle. :)
*  1 pint chicken stock
*  large handful of dehydrated mushrooms (If you have fresh, or even canned, use them. I had some I'd dried a while back.)

So my first step it to heat up the pan and get my fats all sizzling. I'm using my very large, 14 inch cast iron skillet for this today. I would have preferred to use one of my smaller pans, but when I pulled them out they were rusted, and in one case, pitted, badly. So I was left with the larger pan. Which is fine for this, as I have plenty of room and don't need to brown my chicken in batches like I would have in the smaller pans.
I will be doing another post later about how we will be dealing with the cast iron problem.  It appears they got put away damp, which is a big no-no. I don't use them nearly as often as I probably should, so this happens from time to time.


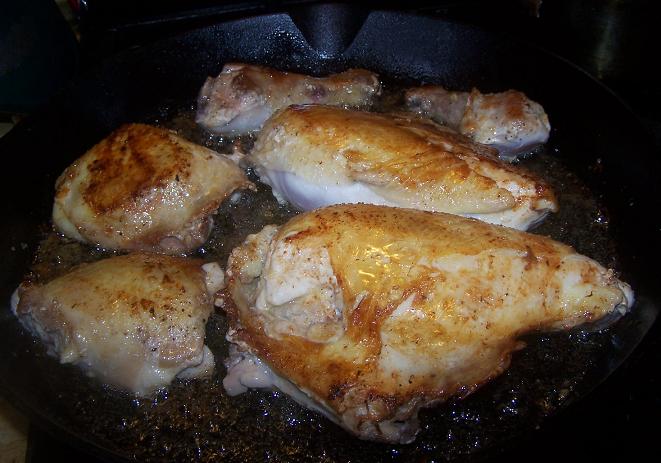
Next, place your chicken pieces in the pan. Since I'm using the larger pan, I have plenty of room for everyone. Also, since my pan is so large, I have the heat up pretty high to help keep the entire cooking area nice and hot.


Once everything is nice and crispy and golden on one side, add your cooking wine and turn the pieces over. I just splashed a little over each piece as I flipped it.


When both sides are nicely browned, remove from pan and let the fats cool enough to be drained. I have a can I keep handy for pouring off fats. Let it cool and congeal  and once the can is full, you can toss it if it isn't suitable for other uses.
(If you are wondering, yes, there are things you can do with left over kitchen grease. You're on the internet, google it... :) )
Please note, your chicken is NOT cooked all the way through at this point.


Do reserve a little of the fats though for sauteing your veggies.

Into the pot will go your sliced onions. Let them have a little room and get a little color, then add in your sliced carrots and your ginger/garlic paste. Mine came in a little jar from the ethnic food isle and says it is a stir fry seasoning. If you have any fresh or tinned minced garlic, use that instead, but I like the addition of the ginger, and it's something I'm trying to get more of into our diets anyway. Add in any other spices and seasoning you might desire. I just added a bit of black pepper. I don't tend to add much salt when I'm working with store bought canned items. They tend to have more then enough salt already in them, but if you like more salt, add it.


Once those start getting a little color, add in your potatoes, then your tomatoes and  stock.


Then you add your chicken back into the pan and let it come to a good boil. Let it boil for about 2 minutes then turn down and simmer. Honestly, at this point I'm really wishing  the smaller cast iron pots were available. They're smaller in diameter, but they are deeper and have a cover. I don't have a lid large enough to fit this pan, sadly, but if I did, it would be covered at this point.
But, since I don't, I'm turning it down to a simmer while I heat the oven to 350. Then I'm going to cover the pan with foil and place it in the oven for about 20 to 30 minutes.


So once the oven is ready to go, turn off your heat, add in your canned corn and mushrooms. Cover with foil and into the oven it goes.


About 25 minutes later, pull everything out and check your thickest piece for done-ness. If your chicken is done, then it is time to finish things off.
Turn your burner back on to medium heat and place pan over it. Remove chicken and let that rest and add in your peas. Taste your sauce to see if there needs to be any final adjustments. I added a little more garlic and pepper.


Return the chicken to the pan for serving (or transfer everything to a large serving platter or bowl.)
This is a great one pot dinner.

The Teenager isn't home at present, so I haven't gotten her input on this, but Hubby and I both enjoyed it. We are having a bit of a lazy day, overslept so we had a late breakfast, so we kind of skipped lunch and opted to just have an early dinner tonight, instead. Pretty much the only suggestion Hubby made is that, next time, I should try frying the potatoes a bit more, maybe using an o'brian style potato. So we shall see, but, for a first time recipe, and him not having a clue what a ragout was, this turned out really, really well. I suspect Teenager will have some issues as she's not fond of peas, but, that is her problem :)

This really is a delicious meal and I am definitely going to be making this again in the future. I've even seen a few recipes for doing this in the slow cooker, so I might have to give that a try in the future as well.


Friday, February 22, 2013

Hamburger buns and fries

Whoa... what is this? Two posts in a row? And with my hand still awkwardly bandaged?
I hadn't planned on writing up another post so soon, but, hubby decided he wanted hamburgers and fries tonight. We didn't have any bun on hand in the house, and no lettuce to do wraps, so it was up to me to make buns. I've not actually done that before.  I certainly know the logistics of it all, but we've never actually bothered to do it. So, tonight we did.

I will start by saying that I totally cheated. I used Gluten Free Pantry's french bread and pizza mix and tossed it all in the bread maker on the dough cycle. I prefer to "cheat" as much as possible when it comes to breads, and, well, I'm going to use my poor bandaged hand as further excuse if need be. :)

So, feel free to use your favorite bread recipe. Bring it to the dough stage where it'd normally be ready to bake, then  you will divide it up into individual "bun mounds."  I did 6 here, but I probably should have gone ahead and done 8 or maybe even 12, but, like I said, it was my first time at this. I wound up with 6 rather large buns as they spread out a bit more then I had expected. Only 3 of us for dinner tonight, so we'll just have big burgers and call it good.
I used an egg yolk that I had left over from the bread, with a little bit of water added to thin it out, to make an egg wash over the buns before they went in. I also added some cracked pepper and sesame seeds to two of the buns. Everyone else wanted them plain, but I figured why not play a bit.


 Pop them in the oven for about 30 minutes or so until they are done. For this type of product, I test for doneness by flipping one over and giving it a tap on the bottom side. It should sound a bit hollow.  Allow to cool then cut in half and set aside until needed.


We're also doing french fries. Normally I'd use our bottled fries, but it appears we are out of those (that, or i rearranged the pantry, moved them and have hidden them from myself.. that sort of thing has been known to happen once or twice....) so we're doing "fresh" potatoes.  I cut the potatoes into fries and have placed them in a bowl of water. You can add sugar to this water if you wish. Doing so will supposedly add in browning. But you do want to soak them for 20-30 minutes if possible. This will draw out some of the potato starch and that will definitely result in better fries. Just make sure they are well and thoroughly dried before going into the oil.


Heat your oil and fry in batches.


Pretty sure most people can figure out how to form a hamburger patty (or you can always buy them pre-formed and frozen..) Cook up your patties to your liking then get to building your burgers!

Here you can see the inside of the cut bun. Nice and dense. These held up very well and didn't crumble to bits like a lot of GF buns do. We have 3 of them left over, so we will be seeing how they  hold up tomorrow. I know the bread when I've used this mix has held up fairly well, but we will most likely toast them for tomorrow as hubby generally likes his buns toasted anyway.


And here's my burger. It's pretty simple as it's winter and good tasting tomatoes and non wilted lettuce are hard to come by up here, plus Hubby's still waiting to hear back on the jobs he's applied for, so we're not buying anything more then we have to right now so mostly sticking to what's in the larder these days. We had some assorted cheeses, pickles and the usual condiments. We also had some turkey bacon, but by the time I sat down to eat, I'd forgotten about it, and, honestly, I'm not sure I could have taken the addition. Hubby would have preferred pork bacon, but we didn't have any of that, so had to make due.
Either way, it was delish. Hubby and the teenager enjoyed their dinners and were very full afterwards, which is always a good thing :)


Thursday, February 21, 2013

Thursday night Meatloaf

Ok. I have to admit, I wasn't sure I was going to get a post out his week or not. I had a bit of an accident which resulted in two of my fingers getting a bit torn up. One of them is pretty bad; a bit of a gouge in the pad and the nail bed is cracked about a quarter of the way across. Not fun to say the least. My finger has been swollen, purple from bruising and partially numb. Not to mention, lots of bandages. So, typing and cooking has been a bit of a challenge. Thank goodness for spell check.
But I decided to soldier on this week anyway, though, sorry, recipes aren't going to be as spectacular as we all might have hoped as things have had to be scaled down a bit for the time being. At least until I can properly hold things again. :)
So, tonight's dinner is meatloaf and mashed potatoes. Household staples and the butt of many jokes in years gone by. Now, if it were whole up to me, I'd be doing a properly veggie packed meatloaf. shredded carrots, olives, spinach, etc. But it's not. My husband likes his meatloaf pretty straight up. So we'll be sticking to the basics. Maybe one day I'll get to do my full out crazy loaf, but not tonight. Now, I will also freely admit that most of my meatloaves, like many other things, tend to play fast and loose with recipes. It's never quite exactly the same twice, as many things will depend on what we have to hand. But tonight I'm trying to stick to pretty close to a "base" recipe.

 So first step is to assemble our ingredients. To make the meatloaf we will be using:
* about 2.5 pounds of ground beef. (I used about half of a 5 lb package)
* 1/2 of a 6 oz can of tomato paste (we will use the other half later..)
* 1 egg
* about half a cup of instant potato pearls (I'd really prefer flakes, but I'm out of those. You can use rice, bread crumbs, whatever you like to add. This works for me.)
* 1/4 c parmesan cheese
* 1-2 tablespoons Worcestershire sauce
* 1/2 onion, chopped
* salt, pepper, and garlic to taste

Combine all your ingredients in a bowl and combine by hand. I wound up needing to move to a larger bowl then I started with here. I was a bit hindered by my injury here. Thank goodness for food grade gloves, but the loss of full usage at present made it hard to dig in properly and I needed more room. More dishes, but, maybe I can get hubby to wash them.  :)


Once everything is combined, turn out onto a lined cookie sheet and mold tightly. If you want to press it into a loaf pan, you certainly could, but I don't generally bother, since you're going to want to turn it out for cooking anyway.
Place your loaf into a warm oven (350 usually works) for about 10-15 minutes while you get the next step done.

Next up is the glaze.  Now, I never use to bother with this step. Never even knew this step existed, really. Not until Good Eats. If you haven't heard of this show, you have missed out and need to go find it. Some episodes and clips are available on Hulu, and there are a few dvd's out, but we're talking a 10 year or so run on Food Network, combining food and the science behind food with lots of funny and fabulous recipes. The host, Alton Brown, has been our go-to guy for recipes for years. I've had to give up or modify some of them since going gluten free, but, where we can, we still rely on his info. Anyway, his show on meatloaf is where I learned of The Glaze, as well as the "open style" cooking we're doing, and it really has made things so much easier and tastier.
So, tonight's glaze consists of:

* the other 3 oz of tomato paste
* 2 tsp prepared mustard
* 1 1/2 tsp prepared horseradish sauce
* 1 tbsp beef stock
* 2 tbsp Worcestershire sauce
* 3 Tbsp ketchup
* salt, pepper, garlic to taste

Combine all ingredients and set aside.


Once the meatloaf has been in the oven for about 10-15 minutes, remove it and apply the glaze. Cover the top and all sides. Basically you are "frosting" your meatloaf. As this crusts over, it will help maintain the moisture inside your meatloaf.  Return to the oven and let it continue to bake for another half hour or until done. Depending on the size and density of your loaf, it may take more or less time.


As you can see, I also sprinkled more Parmesan cheese over the top. You've got to play to your audience. So do what you, and they like.


Once it is done, let it sit for a few minutes to cool.


Then slice and serve. We had mashed potatoes, gravy and corn.
The teenager even had seconds tonight, so we were all happy with this. And we have plenty of left overs for tomorrow's lunch or a second dinner later this weekend.

Friday, February 15, 2013

Late Valentines Day Dinner

Ok, so as mentioned previously, our plans for Valentines day got delayed a bit due to the birth of a co-worker's grand baby, which meant I got called in as a last minute substitute at the library where I'm, as my Hubby calls it, "the super secret Librarian on call." I don't work there often, but, when they need a fill in, sometimes they call me. But, Hubby surprised me by making dinner while I was at work so that he was just getting things on the table when I came home. It was so sweet of him. Nothing fancy, just a ground beef and potato gratin, but it was wonderful.
Anyway, we weren't going to be doing anything big or fancy this year anyway, and what little we might have done (like my annual splurge on chocolate covered strawberries) got the kibosh after Hubby's lay off earlier this week. So it came down to raiding the freezer and pantry and seeing what I could come up with from what is on hand. Let me just say, having a well stocked pantry, some long term food storage, and a well stocked freezer or two comes in very handy when times get tight.
I managed to dig out a large cross cut rib roast that would make wonderful steaks. We're talking just over 8.6 pounds of roast here, so I got 9 good sized steaks and still had a small roast left over, and gobs of trimmed fat and bits for adding to stock and things later. More meat then we need for this little dinner, so some of it went back into the freezer.

From the pantry, we will be adding potatoes au gratin. I would usually go ahead and just make these from scratch, but, we're out of fresh potatoes, so box mix it is! We have a big 4 pack from Inn on the Creek foods. It is gluten free, so yay. We will also be serving with corn, because I let Hubby pick the veggie side. (He is a horribly picky eater when it comes to veggies.. he has a short list of acceptables, everything else gets classified as a "weed." I hide more veggies from him then I do the kids...)

So, after trimming and cutting the roast into our steaks for tonight, I placed 5 of them on a parchment lined cookie sheet so they could be seasoned. I had asked Hubby what "flavor" he wanted and he said "season salt and blackened.. in butter!" And this week, what he wants, he gets. So I gave each steak a good coating of fresh ground sea salt, course ground black pepper, and an organic no-salt seasoning blend. I used Kirkland brand stuff from Costco since that is what I have on hand. You could also use Mrs Dash, or Lowry's.. What ever you have or prefer, feel free to use.  I flipped and seasoned both sides, then wrapped the whole tray in plastic wrap and stuck it back in the fridge to sit until we're ready to cook.


Ok, a few hours and some minor errands later, it's time to get cooking!
I kinda loosely followed the instructions on the package for the au graitn potatoes. I cut the amount of milk it called for, but upped the butter and tossed on some real shredded cheese at the end to fancy things up a bit there. Then after that got popped into the oven, I got started on the steaks. I had pulled them out of the fridge before starting the potatoes so they would have time to get a little closer to room temperature before cooking.

Fry pan, low to medium heat.  Add a good sized dollop of butter and let melt. Once the butter is melted, add your steak. Cover and cook on low for a few minutes, then flip and cook a few more minutes. This allows the steak to cook through before upping the temp to get the good crust.

Once your steak has had time to kinda steam itself, remove the lid and up the temp. Since I was doing multiple largeish steaks, I kind of cheated and did this in two pans. I had a low temp pan and a high temp pan and moved them from the low temp to the high temp so I could then start the next steak in the low temp as I went. Hope that makes sense.
Anyway, in the high temp pan, or after removing lid, cook on medium to medium high heat to create a nice dark "crust" on the meat. Cook until they are as done as you like.

Let set about 5 minutes or so, then serve.


We had the steak, au gratin potatoes, home made pickled beets, and corn/green beans.

We also made home made milk shakes simply by combining vanilla ice cream, milk and chocolate syrup in the blender. Yum!


Thursday, February 14, 2013

Valentines Day... postponed

Well, I had plans. But this has been a week of sudden changes of plans, so I should have expected something.
My husband got laid off on Tuesday. Never fun news. Things have been tight lately anyway as they had already cut his hours, so we didn't have much planned for today. He has a doctor's appointment this afternoon, and I had raided our freezer and pantry stashes to come up with our dinner plans...  We will be taking a large cross cut rib roast and cutting it down for steaks, doing a nice dry rub on that and cooking with real, home made butter. This would be served with au gratin potatoes, home made pickled beets and whatever else I can throw together. We hadn't yet decided on what, if anything, we'd do for dessert yet. I was going to figure that out this morning.
But, this morning I got a call from the library. My other gig needs me to fill in for the "late" shift today. One of the librarians had a grandbaby born last night and they were up all night with their family because of this. so, congrats to them.. Just kind of a bummer for me.
So the post I was going to do for today is getting postponed. With any luck, I'll be able to get this all done tomorrow instead, and maybe we'll get really lucky and all the applications hubby has been sending off this week will get him re-employed quickly.
Meanwhile, I have a well stocked pantry, full freezers and a good short term (at this point anyway..) food storage  supply, so we've got plenty of food.

Monday, February 11, 2013

Bean, Beef and Bacon soup

So over the weekend I was rummaging through the freezer and came across some odds and ends of old packets of bacon. Real Pork Bacon. Most of the time, I buy turkey bacon because it is better for us, and, honestly, I've never been much of a fan of pork in general, but, once in a while, we do buy the "real" stuff. Mostly it is when we're in chili making mood, as hubby needs it for his "Man Chilli," a recipe I will have to get from him and post one of these days, but is basically every kind of meat he can think of, lots of spice and NO beans.
But, back to today's recipe. So I have these left over bits of bacon languishing in the freezer. One packet was well and gone and had to be sacrificed to the gods of freezer burn, so I really wanted to do something with the rest of them before it was too late. I have lots of beans, and, well, beans and bacon is good. I had some left over ground beef. Beef and bacon are good together as well. Why not combine all three?!? And so, Been, beef and bacon soup is born. Not a whole lot of pictures today.

I put the beans out to soak last night. I did not take a picture of t his because.. well, soaking beans are boring.  Just put them in a bowl, cover well with water and keep an eye on them. If they swell up and break the surface of the water, add more water. Let sit overnight. I always drain, and replace the water at least once during the soak time. Once you are ready to start making your soup, drain and rinse and place into a pot, cover with water and simmer until they start to soften. I added  half an onion, chopped, to the beans while they cooked. Drain them yet again, and set aside.
For the record, I used Hurst's HamBeens brand 15 bean beef soup bean mix.The beans them selves are naturally gluten free. Here's what the company says about their spice mix:
All dry beans are a naturally gluten free product and every Hurst’s seasoning and spice blend is now 100% gluten free as well (Cajun used to be the exception). Our facility however is not specifically dedicated gluten free as we pack both barley and pasta as well. Please call us with any questions or concerns @ 1-800-HAMBEEN.
So you can use it, or not, as you feel comfortable doing. Today, I used it, but if you don't want to, you can certainly skip it, or use entirely different beans. If you opt to use canned beans, you can skip the soaking and bean cooking steps.
Now, you do have the option of doing this in a slow cooker as well. In which case you'd want to do all of this the night before so you could just assemble and let it do it's thing. I decided to do stove top today, since, honestly, I'm kind of making this up as I go.. which is usually how a lot of my day to day cooking goes.
While the beans are cooking away, you can do your prep for the next few steps. I chopped up about half a bunch of celery and 3 carrots.
Then I chopped up the bits of bacon. I had 2 partial packets, which, combined, gave me almost an entire packet of thick cut bacon. Use what you have or what you prefer. One of the packets was a steakhouse seasoned one which is going to effect some of my seasoning decisions that you might not have to work around.
Once the beans were done and drained, I placed the chopped bacon into the same pot and turned the heat up to medium. Once that was sizzling, I added about a pound of ground beef and let all of the meat combine and brown. Once the meat was done, I added 3 cups of beef broth, the chopped veggies (about 3 cups, combined) and then the beans, which I measured out to be 7 cups, cooked beans. I also tossed in a little corn, maybe a half tablespoon or so of garlic powder, a few splashes of Worcestershire sauce, a good shake of large grind pepper, about a tablespoon of apple cider vinegar (eyeballed) and a can of Italian diced tomatoes.
Cover and let simmer on low.
this is my taste testing bowl. it's really the only way to know how things are progressing.

It's probably not the world's best soup or anything, but it is hearty and tastes pretty darn good on a chill winter's day.  It is simple to make and odds are that most, if not all, of the ingredients are bound to be in most pantries.

1 20 oz bag of 15 bean soup, beef or ham flavored will do, or 20 oz dry beans, assorted, or about 7 c cooked/canned beans
3 cups beef broth
about 1 package of bacon, roughly chopped
1 lb ground beef
1/2 onion
3 carrots, chopped
@2 cups celery, chopped
*veggies can be replaced with 3 cups or so frozen mixed*
1 can Italian diced tomatoes
1 tbsp apple cider vinegar
garlic powder and pepper to taste
2 tbsp Worcestershire sauce