A week ago I received an advance review copy of Stephanie O'Dea's new cookbook, 365 Slow Cooker Suppers. I have to say, I've been following her blog, A Year of Slow Cooking for a few years. I discovered her about a year before learning that I needed to go gluten free and I really hadn't noticed that her recipes were all gluten free, or easily could be as long as you check your ingredients, you know, use gluten free soy sauce, or gluten free breads, that sort of thing. So when I did have to make that change and started looking for gluten free resources online, I was happy to discover that one of my favorite blogs was just full of great, yummy recipes.
So when I had the chance to review her new cookbook, I was thrilled! This book is wonderful, the first time I glanced through it, I easily found a dozen recipes that we just have to try. This book is filled with great recipes and wonderful, bright pictures. The recipes are broken down into the following categories: soups and stews, beans, poultry, beef and lamb, pork, sandwiches, meatless main dishes, and fish and seafood.
The recipes we've tried have been wonderful. The first dish we had to try was the 5 ingredient stroganoff. We've tried making gluten free stoganoff before, generally the recipes called for gluten free cream of mushroom soup, and it really wasn't very good. This recipe, however, was divine. my non-gluten free hubby, first bite in, said "next time you make this..." That is high praise from him, especially after just one bite. It was so creamy and delicious. We are definately going to be making this on a regular basis. Hubby and I had 2 bowls and my step daughter really enjoyed it as well. I had some of the left overs for lunch today and it was still so very good.
I, of course, can't share the recipe here, but you should totally go pick up this book. If you know anyone who has recently had to go gluten free, this would be a great gift, or if you want to know you can prepare safe meals for them at your home, again, this would be a great book to add to your collection. And even if you aren't gluten free, this is still a great recipe book. The recipes are all easy, quick, and sure to please your entire family.
Wednesday, October 2, 2013
Monday, September 30, 2013
Review Time: Pasta Prima 5 cheese Ravioli
Ok, so here's a quick product review
.
 I had been hearing for a while that Pasta Prima was going to be putting out a gluten free variety of their "fresh" ravioli. I had looked and looked but never found. This weekend I finally found them, so I just had to give them a try. I found them in our local Carr's (Safeway) store. Of course I picked them up and just had to give them a try.

They only had the 5 cheese variety, so that's what I went with. 8 oz package has 2 servings, so don't plan on feeding your family with this, but it makes a nice quick lunch or gives you and option for a solo dinner while the rest of your family has their "regular" pasta.

Taste and texture were pretty good. Being a cheese filling, it was a little "bland" by itself, but I added in a nice garlic tomato sauce and that was just yummy. I did have some leakage as at least one of the ravioli broke.
 This probably won't be making a regular appearance in our menu around here, but overall I can give it a positive review. Since I had this for lunch, I wasn't able to share this with hubby to get the non-gluten free opinion on this, but I liked it.
** note: I am getting nothing in exchange for this review, just want to get my opinion out about products I've tried and either liked or didn't.
.


They only had the 5 cheese variety, so that's what I went with. 8 oz package has 2 servings, so don't plan on feeding your family with this, but it makes a nice quick lunch or gives you and option for a solo dinner while the rest of your family has their "regular" pasta.

Taste and texture were pretty good. Being a cheese filling, it was a little "bland" by itself, but I added in a nice garlic tomato sauce and that was just yummy. I did have some leakage as at least one of the ravioli broke.

** note: I am getting nothing in exchange for this review, just want to get my opinion out about products I've tried and either liked or didn't.
Friday, September 27, 2013
Busy, busy, busy
So September has been a bit busy and crazy, this past week or so especially so. But there will be several posts coming up, as soon as I have time to sit down, organize and write them..
I've been busy canning and dehydrating food this past week and that will be going on next week and perhaps into the week after that as well. We've had our first freeze and snowfall of the season. And I've got some reviews coming up! There are some new gluten free food items out that I will be taking a look at, and there's a new cookbook out by one of my favorite gluten free bloggers and I had the chance to get my hands on advance copy of her latest cookbook. It's out now, but I just got my copy today, because, well, things.. anyway... I've had the chance to skim through it a bit today and I already have about a dozen or so recipes bookmarked for upcoming usage. (They will come in particularly handy while I'm spending my days bottling and processing potatoes the next week or so...)
So, not too much to post today, but things will be coming.. including a few quickly whipped together creations from this week's canning crazed mind, though pictures may not be as prevalent on some of them... Sorry, but I was busy and crazy and didn't think about it until it was too late. Ah well.
So, keep your eyes posted here.. lots of things will be coming soon! I promise!
Monday, September 2, 2013
Bacon Cheeseburger dip
So my husband saw this recipe posted on facebook the other day and asked me if it was one I could do. He said it looked like it would be gluten free an that meant I should have no problem making it. So we went and grabbed the one or two items we needed and we made this for our weekend splurge. (It's a holiday weekend and while everyone else is getting 3 or 4 days, he wound up with overtime all week and was asked to work Saturday and Monday and only got Sunday off, so we decided to make the best of his 1 day weekend and he pretty much just took the day to be lazy and eat junk food. It doesn't happen often, but we make the best of it when we do..)
Anyway, we made this, and oh yes, it is very yummy. We opted to serve this with potato chips (in place of potato buns, which is what he'd want for burgers..) but it would go very well with toast, or even as a sandwich, I would think..
Here's the recipe as I pulled it from the facebook post.

Bacon Cheeseburger Dip (careful~ this is addicting!)
1/2 pound ground beef
8 bacon strips (cut into chunks)
1/2 diced onion
1 clove garlic - chopped
4 oz cream cheese (softened)
1 tablespoon worcestershire sauce
2 tablespoons ketchup
1/2 cup sour cream
1/4 cup mayonnaise
1/2 cup mozzarella, shredded
1/2 cup cheddar cheese, shredded
Pre-heat oven to 350º. Cook ground beef; drain.

Cook bacon until crispy (drain; keep 1-1/2 T grease in pan).
Saute onion and garlic in grease. In a large bowl mix cream cheese, sour cream, mayonnaise, cheese, worcestershire and ketchup. Add beef, bacon, onions and garlic to mixture above and stir until combined.
Pour into baking dish and bake for 15-20 minutes.

We did like this. It is very filling. I tried it adding a smidge of dill pickle relish as well, just to see. That was a good addition as well. We're thinking next time we'll add jalapenos as well. As you can see, to serve, I portioned out into individual ramekins,, topped with a little shredded cheese and chopped green onions.
I have no idea where this recipe originated, I'd give proper credit if I did. Hubby thinks next time he'd like to try it with less cream cheese and more sour cream, but this is very good, as is. I'm also thinking that I'd prefer to make my own mayo for it next time. I simply didn't feel like taking the time to do it this time. I'm also thinking this would be wonderful done in a small crock pot for holiday or buffet dips. (We even discussed the potential of using velveeta for this, if you wanted to go with a more melty cheese option.. Not the healthiest option, but then, this isn't a healthy dish by any means...)
Friday, August 30, 2013
One of my Favorite bloggers!
Ok, so things have been a wee bit utterly insane around here lately.. (step daughter moving in, moving out, moving back in, an emergency foster placement and all sorts of other things..) and I haven't been able to blog as much as I'd like to. Cooking has been whatever I could get a barely 3 year old to eat.. and a very picky one who was use to primarily processed food, so that was interesting.
But, at present we are once again small child free and trying to eat better again. This week it has been mostly soup. I made a big pot of soup with some chicken stock I'd made a while back, an assortment of veggies, some bits of chicken and some gluten free pasta. It's been very good and nicely filling, but today is making the third night in a row of it, and we're all rather happy this will be the end of it. (I am making some gluten free bread to go with it tonight, which will be nice. Hubby has had his "regular" bread the last few nights, but I haven't had any, and I made fresh butter the other day as well, so I am looking forward very much to it..
Anyway, I've also been busy flash freezing produce and was getting ready to do some canning just before we got the kids, so that had to get put off. Maybe I can get back to that this next week.
It has been very cold and rainy, so soup has been nice, and might go onto chili next. I make some great, crazy chilis, so if I get the chance to make chili in the next few days, I will get that posted.
But, I started this post today to share one of my favorite gluten free bloggers. Stephanie O'Dea from A Year of Slow Cooking was one of the recipe bloggers I started following before I learned I needed to be gluten free, but, as luck would have it, every single one of her slow cooker recipes is gluten free (at least as long as you read your labels).
We've found so many recipes over there that we really love and have gotten much use from. Some of our favorite recipes are:
Crock pot ribs (we used boneless beef short ribs)
Pepperocini Beef (makes wonderful sandwiches)
horseradish scalloped potatoes (doesn't that just sound yummy?)
Lemon and herb roasted chicken
Cinnamon Sugar Almonds
Apple dumplings
There are loads and loads of other recipes of all sorts over there, and she's got 2 cook books out (and third one is coming out in September!)
You really should check her site out, try some of the recipes, maybe buy a book if you like her stuff.. :)
Hopefully I will be able to get her new book shortly after it comes out and will be able to review that then.
Sunday, July 28, 2013
Product review time! El's Kitchen Snaps and Medleys
A few weeks ago, I volunteered to write a review on Amazon for a new gluten free product in exchange for free samples. Yesterday, my samples arrived.
I've never been asked to write a review for a product before, so this was a bit of a first for me, but, happily, it turned out to be a product I have no problem supporting. My samples came from a new company called El's Kitchen. They are running 2 new gluten free snack lines and I got a sample from each.
 The first sample I got was from their Snaps line. This is a line of bagel chips. This line is free from gluten and wheat, eggs, nuts, peanuts, dairy and soy. It is also free of trans fats. It comes in a 4 oz bag and each 1 oz serving has just 90-100 calories.
They come in 3 different flavors, original, garlic and herb, and cinnamon sugar.
The sample I got was for the cinnamon sugar snaps. I have to say, they were very good bagel chips. It has been a while since I've had "traditional" wheaty bagel chips, but, from what I can remember of them, these were spot on. And it had some great flavor. Not too sweet, but a very good blend of cinnamon and sugar.
I had my non-gluten free husband try these as well and he really liked them as well. That is saying something as he often has flavor or texture issues with some of the gluten free products.
 The second line of snacks they are offering are called Medleys. This snack contains a mixture of corn nuts, flax seed corn chips, pretzels, potato chips and bagel chips.
This line also has 3 flavor options: original, cheddar and the sour cream and onion. This line comes in a 5 oz bag and each 1 oz serving varies from 140 to 150 calories per serving.
I got the sour cream and onion flavor as my sample from this line and oh boy, did we like this. Hubby and I really, really liked this one. Really our only complaint was that we wanted more, which is a good thing for the company. :)
The flavors and textures of the various components blended very well together, and the flavor blend wasn't overpowering. It was just really very good.
This line contains no trans fats, no eggs, nuts or peanuts.
These products are currently available via Amazon.com and are retailing there for $5.12 per 4 to 5 ounce bag. That might seem a bit much (and really it is..) but, sadly, that's about typical for gluten free products, and is actually better then some prices I've seen.
This was a good enough product that I feel comfortable recommending it to anyone who is looking for a good, crunchy snack. It won't be joining our "regular" line up, but it is going to be watched and ordered once in a while.
** Note: The only "payment" I received for this was my free samples, in exchange for which, I agreed to write a review on Amazon.com. I liked the product enough, and had wanted to start doing some reviews on my site, that I took it upon myself to write my review here as well. **
I've never been asked to write a review for a product before, so this was a bit of a first for me, but, happily, it turned out to be a product I have no problem supporting. My samples came from a new company called El's Kitchen. They are running 2 new gluten free snack lines and I got a sample from each.

They come in 3 different flavors, original, garlic and herb, and cinnamon sugar.
The sample I got was for the cinnamon sugar snaps. I have to say, they were very good bagel chips. It has been a while since I've had "traditional" wheaty bagel chips, but, from what I can remember of them, these were spot on. And it had some great flavor. Not too sweet, but a very good blend of cinnamon and sugar.
I had my non-gluten free husband try these as well and he really liked them as well. That is saying something as he often has flavor or texture issues with some of the gluten free products.

This line also has 3 flavor options: original, cheddar and the sour cream and onion. This line comes in a 5 oz bag and each 1 oz serving varies from 140 to 150 calories per serving.
I got the sour cream and onion flavor as my sample from this line and oh boy, did we like this. Hubby and I really, really liked this one. Really our only complaint was that we wanted more, which is a good thing for the company. :)
The flavors and textures of the various components blended very well together, and the flavor blend wasn't overpowering. It was just really very good.
This line contains no trans fats, no eggs, nuts or peanuts.
These products are currently available via Amazon.com and are retailing there for $5.12 per 4 to 5 ounce bag. That might seem a bit much (and really it is..) but, sadly, that's about typical for gluten free products, and is actually better then some prices I've seen.
This was a good enough product that I feel comfortable recommending it to anyone who is looking for a good, crunchy snack. It won't be joining our "regular" line up, but it is going to be watched and ordered once in a while.
** Note: The only "payment" I received for this was my free samples, in exchange for which, I agreed to write a review on Amazon.com. I liked the product enough, and had wanted to start doing some reviews on my site, that I took it upon myself to write my review here as well. **
Tuesday, July 9, 2013
Chocolate Peanut Butter Chocolate Chip Cookies
Because we all need cookies from time to time:

1 cup sugar
1 cup peanut butter (or other nut/seed butter)
2 tablespoons cocoa powder
1 teaspoon vanilla
1 egg
1/4 cup mini chocolate chips (I used the Enjoy Life brand.)
I've been thinking about making cookies for about a week or two, but just never quite seemed to get around to it. The last few weeks have been busy with everyone in and out and visiting for the summer and then the holiday.
Tonight, I had just put dinner in the oven (meatloaf...) when my husband called to let me know that he had a stop to make tonight and would be about a half hour later then usual, which meant dinner would be delayed, which meant I needed to pull the meatloaf back out.. But I had this nice, warm oven and some extra time, so, cookies!
These are very simple and quick cookies. I've seen several variations on the grain free peanut butter cookies online, but, well, I really like chocolate, so we needed to make some modifications..

I started by measuring my cup of sugar and a cup of peanut butter into my mixing bowl. I like chunky, and that's what I had, so that's what I used. Any peanut butter or other nut butter works well for this.
Then I decided to add 2 tablespoons of cocoa powder, my vanilla and the egg. I mixed these until they were well combined, then I added my chips and mixed those in as well.

Then I scooped them onto my baking stone. I used my 1 tablespoon measure and made rounded balls. Once they were all places, I gave them the traditional peanut butter cookie crosshatch.
And into the oven they went, while I peeled potatoes for mashing.

They baked for about 10-15 minutes at 350. They tend to run closer to 15 minutes for me, but some of the other pages I've seen this posted on calls for 10, so watch your first few batches and adjust the time to suit your oven and altitude.

Out to cool then try not to eat them all before dinner :)
Yield for me, today: 17 cookies
Friday, June 28, 2013
Quick change in dinner plans...
Well, it has been a while, and I'm still not back up to speed. Lots of things have been going on, and now I'm getting ready to head off for possible jury duty for the next 2 months... so lots of limbo right now.
A few weeks ago we had signed up to feed the missionaries from our church. We had heard that they had some food allergy issues that hadn't been being taken into consideration when people were having them over for meals. The issues were fairly simple ones. One is allergic to mushrooms, the other has to be dairy free. Well, those are easily enough handled so we signed up and decided to provide a wonderful all out meal to make up for the lack they'd been getting.
I planned on making a slow cooker pot roast with a nice tangy sauce, gluten and dairy free dinner rolls, corn on the cob, my infamous pickled potato salad - with a home made mayonnaise, and a nice slow cooker dairy and gluten free chocolate cake. Note: The cake recipe isn't mine. It's one from another GF blogger and the link can be found at http://www.glutenfreegigi.com/slow-cooker-gluten-free-chocolate-cake-with-fudge-sauce/
Then things changed. The night before we were to have them over for dinner, they called to confirm, and let us know that the person with the dairy issue was no longer in the group. Instead, we had someone who could not have sugar or sweeteners of any kind, and could not have any grains or starches. Ok.. time for a challenge. This meant that most of my dinner plans had to be quickly rearranged and simplicity was going to be the key.
So, we still had the slow cooker pot roast, but instead of the sauce I had been thinking of using, I simply threw in most of a chopped onion, gave the beef a lovely salt, pepper and garlic dry rub, and then added a splash of my home made turkey stock to the bottom of the pan. For sides, well, we knew she was good with leafy greens and most veggies, so we had green beans and a lovely salad full of all sorts of things. Cucumbers, carrots, radishes, green onions, cabbage, lettuce and tomatoes all went into that salad. And I made a simple vinaigrette using some garlic balsamic and olive oil with a little garlic, ginger, onion and pepper added to it. Not the best I've ever made, but, you make due with what you have and get things done.
I don't have any pictures from tonight's dinner. Most of the things that would need a recipe were from the original plan and have been covered in other posts anyway. But, I just wanted to get back into the posting sadle and show that, no matter what plans you make, things can always go a bit sideways at the last minute and cause changes. A few years ago, that sort of thing would have thrown me into a melt down. I really did not do well with change or surprise. Since going gluten free, that has gone away. And I also wanted to show that you don't need to be afraid of feeding people with food issues. We had a very simple meal, but it was delicious and everyone at the table had a good time and felt included.
Sunday, June 2, 2013
Chicken and Black eyed-pea Soup
So, my online classes are coming to a close, and the boys are off camping with their father this last week before their mom gets back. M has gone back to her mother's home and B2 has not yet arrived..
So I'm going to try to start getting back and active with this blog.
Tonight I made a very simple soup for dinner. Didn't take a lot of photos because I wasn't sure I was going to be posting this, but, here we are..
Ingredients that went into this soup:
1 large frozen chicken breast, diced
1/4 diced onion
1 quart chicken stock
@ 1 quart of water
1 can stewed tomatoes, diced, plus juice
garlic
Worcestershire sauce
These items were placed into the pot and allowed to come to a simmer, cooking the chicken.
Then I added:
1 cup frozen corn
1 can black eyed peas
1 pint carrots
pepper
basil, sage, or whatever combo of herbs and spices you like. Taste it and adjust as needed
Allow this to come back to a simmer and when everything is heated through, it is ready to serve.

It's a cold and rainy Sunday here, so soup seemed just the thing. And since it's down to just the 2 of us for a few weeks, we're going to try to focus on very simple foods. We'd also both like to drop a few pounds, and soups are a great way to help that along. The are nice and filling, but can be lower in calories because you are filling up with liquids.
Tonight's soup was served with some rolls we had in the freezer. (Hubby's were sourdough, I believe, and mine were Udi's whole grain, gluten free rolls.)
Friday, May 17, 2013
Nutrition classes week 2 (May 13-19th)
Ok, so for this week's cooking assignment for the Child Nutrition class, our object was to make a "balanced breakfast."

We needed to include 1 source of complex carbohydrates, a source of protein and at least 1 fruit or veggie. I decided to make a quiche. I'd seen a recipe for an oatmeal pastry crust from the 1940's rationing website (1940sexperiment.wordpress.com) and figured I could adapt that fairly easily to be gluten free. It doesn't roll out like a traditional pie crust, instead I just plopped it in the pan and spread it around with damp fingers, but it worked well and tastes very good. Will probably be using that crust a lot.
So here is my modified recipe:
Gluten Free Oat Pastry Crust:
3/4 cup of Pamela's Baking and Pancake mix (It originally called for a self rising flour.. I had this handy, so used it.. any good flour blend will do, just make sure to include baking powder)
Pinch of salt (I didn't add and didn't notice it missing, though with a different filling it might be more noticeable)
1-2 tbsp of butter or "cooking fat"
1/4 cup rolled oats
water
1 tbsp ground flax seed meal ** (this was not in the original, but I thought it would make a good addition as I'm also working on getting more fiber into my diet. You don't need to add if you would rather not.)
Mix the flour, salt and butter and then add in the oats. Combine well and then drizzle in enough water to form a sticky dough.
Spoon into a greased pie plate and spread mixture around with damp fingers.
Par bake the crust at 350 for about 10 minutes.
Then I chopped and fried up 3 strips of turkey bacon and chopped up some assorted veggies. I used pea pods, onions, green beans, assorted bell peppers, broccoli, zucchini, carrots and mushrooms. Then I diced 2 tomato and basil flavored mozzarella cheese sticks. I combined all of these and filled the pie shell up, adding more veggies as needed until it was full then sprinkled it with some garlic powder and pepper.
I cracked 6 eggs into a bowl and added some Worcestershire sauce and whisked those together and poured it over the veggie/cheese/bacon mix.
Out it into a 350 degree oven and baked for about 35-40 minutes until the eggs are set.

A serving would be 1/6th of the quiche. I have been having it left over and cold for my breakfast all week and am really enjoying it. You could easily change up your fillings to use whatever your family likes or what you have to hand.
These classes have really gotten me thinking and paying more attention to what my family is eating, and it's really coming at a great time as we are still coping with some financial recovery from our stints with unemployment. One of the videos we watched in the Nutrition, Health and Lifestyle class featured a chat with Peter Menzel about his book, Hungry Planet. It showed pictures of families from around the world with 1 week's worth of food... everything they would typically eat in a week and the USD equivalent of what was spent on that food. It was really interesting and fascinating.. refugee families in Chad were living on basically less then $1.50 a week.. not per person, but for the WHOLE family. And there was 5 or 6 people in that family if I recall correctly. Just amazing.
So, to help us save money right now (so we can pay down the credit cards and such we lived on while unemployed..) we're going to be trying to simplify our diet and our food budget. It's going to mean giving up some variety and we might get mighty sick of some things after a while, but we're going to give it a try. And we're not giving up everything or going too drastic all at once.. I know there'd be a revolt in the house if I tried to do too much, but we are going to be cutting back. We're going to try to focus on more veggies as well. Lunches are going to be some nice, lovely big salads. (I'd rather do them for dinners, but Hubby needs easily packable lunches, so I would have some problems with making that our main meal just yet.. and everyone's a bit scattered in the mornings yet, but I've got some ideas there too... just have to see if I can pull them off... This quiche would be great, though there's too many "weeds" in it according to Hubby... his limited veggie tolerance is one of my biggest hurdles...)
Tuesday, May 14, 2013
Nutrition classes weekt 1 (May 6-11th)
So, in the midst of the on-going babysitting/homeschooling I'm doing this month, I also signed up for some online nutrition classes. I've been having a lot of fun and learning all sorts of things. I'm taking the classes through coursera.org and really have nothing but good things to say so far. I'm taking a Nutrition, Health and Lifestyle class and a Child Nutrition class.
For the Child Nutrition class, we have a weekly cooking assignment where we make something that meets certain requirements, then post pictures and a description and the other class members review and evaluate.
For our first week, we were asked to make a "colorful vegetable main dish featuring at least 3 vegetables."
Now, if you know me, you know I'm going to play around with a few things for something like this... and I did.. I make 4 different dishes then picked the one that I thought tasted best, photographed best and best met the requirements.. so, here are the 4 dishes I made:
The first one I did was simply a veggie pizza.
 I used:


I steamed some frozen cauliflower and mashed it up with a little bit of butter powder to make a "rice" substitute.
Then I sauteed the rest of the veggies with a little bit of garlic powder and soy sauce.
One at a time, soften the wraps as directed on package, place a spoon of the cauliflower "rice" mix, top with a spoon of the veggie mix, add a sprinkle of sesame seeds and roll.
I've been on a little bit of a spring roll kick lately, as it's such an easy way to make lunch with assorted left overs, so it really wasn't much of a surprise that this is what I picked.. I will get to see my evaluations in a few more hours, and am working on the next assignment (A Balanced Breakfast) and am pretty sure I know what I'm going to do so I will be posting that here in the next few days if all goes well (and we don't have repeats of last week's tantrum melt downs... oye... )
For the Child Nutrition class, we have a weekly cooking assignment where we make something that meets certain requirements, then post pictures and a description and the other class members review and evaluate.
For our first week, we were asked to make a "colorful vegetable main dish featuring at least 3 vegetables."
Now, if you know me, you know I'm going to play around with a few things for something like this... and I did.. I make 4 different dishes then picked the one that I thought tasted best, photographed best and best met the requirements.. so, here are the 4 dishes I made:
The first one I did was simply a veggie pizza.

Rustic Napoli herb gluten free crust
Fred Meyer pizza sauce
fresh mozzarella cheese
sugar snap pea stir fry veggies
(carrots, pea pots, yellow peppers, onions, mushrooms)
The pizza crusts are pretty small so this made a very small pizza which I had for lunch one day. It's not my favorite gf pizza crust, but it's one I had on hand, so I used it.. I would have liked to have tried a cauliflower/cheese crust, which I've seen online, but I didn't have any fresh cauliflower, so maybe next time... This was pretty good, though could have used more veggies then I used..
The second dish I tried was a baked omelet (aka fritata)

2 whole eggs
2 yolks (they were in the fridge and
needed using up)
2 spears asparagus, frozen
1 inch zucchini, sliced and quartered
sliced bell peppers
1 mushroom cap, large, diced
baked at 350 til done. Added flax seed
meal at the end for fiber and covered with a little bit of mozzarella cheese and placed upside down on the plate. I split it to show off the veggies.
This was probably the biggest failure. It needed.. something... maybe some more cheese or some Worcestershire sauce or something.. it was still edible, just not very great..
Meal number 3 was a veggie enchilada!


broccoli, zucchini, bell peppers
sugar snap pea stir fry veg. - sugar
snap peas, carrots, mushrooms, bell peppers, onions, water chestnuts
enchilada sauce
cheese sauce
cheese
olives
tortilla wraps
I sauteed the veggies and mixed them with the enchilada sauce and the cheese sauce.
I greased a small mini-pan and placed a spoon of plain sauce in the bottom, spread it around and then put in a layer of torn tortillas. Cover with the veggie/cheese/sauce mixture, cover with tortillas and another layer of the mix and repeat until pan is pull. Cover the last layer of tortillas with a thin layer of the veggie mix and a little more of the plain enchilada sauce. I cheated horribly and broke up a piece of sandwich cheese for the top and sprinkled some chopped olives over the top.
Bake at 350 for about half an hour or so until done. Serve with sour cream.
This one was a bit spicy but very good. I had enough left over veggies that I made a second one of these and tucked into the freezer for later.
And the last one I made, this is the one I wound up submitting. It was really down to this and the enchilada, but this one photographed so much better, so it won...
Veggie Spring Rolls!

cauliflower “rice”
veggie stir fry – sugar snap peas,
carrots, mushrooms, bell peppers, onions, asparagus, water chestnuts
soy sauce
garlic powder
butter powder
spring roll wraps
I steamed some frozen cauliflower and mashed it up with a little bit of butter powder to make a "rice" substitute.
Then I sauteed the rest of the veggies with a little bit of garlic powder and soy sauce.
One at a time, soften the wraps as directed on package, place a spoon of the cauliflower "rice" mix, top with a spoon of the veggie mix, add a sprinkle of sesame seeds and roll.
I've been on a little bit of a spring roll kick lately, as it's such an easy way to make lunch with assorted left overs, so it really wasn't much of a surprise that this is what I picked.. I will get to see my evaluations in a few more hours, and am working on the next assignment (A Balanced Breakfast) and am pretty sure I know what I'm going to do so I will be posting that here in the next few days if all goes well (and we don't have repeats of last week's tantrum melt downs... oye... )
Tuesday, April 23, 2013
break time
Due to a friend's family emergency, things around here might be a bit slower then usual.. One of my neighbor's has to go out of state to help her parents recover from some medical issues. Taking her kids would have made things very complicated, so I will be watching them during the day while their dad is at work. So I'm going to be a bit busy and might not have much time to play with recipes.. If I come up with anything at all interesting, I will do what I can to get it posted. Mostly we tend to eat enchilada casserole, nachos, pasta, rice and whatever... fairly basic stuff...
Will keep you posted as things happen :)
Will keep you posted as things happen :)
Thursday, April 18, 2013
Chicken Stock - part 2: The Canning
Ok, technically it's bottling, but that's a semantic issue...
First, a note:
I half thought about delaying this post due to the unfortunate happenings in Boston earlier this week. However, in the end, I decided that I would go ahead with this. Pressure canners can be dangerous. It is always very important to read and follow the instructions that come with your canner. But they are very useful tools in the kitchen. The ones used in the bombs in Boston were much smaller cookers then are generally used in home canning.
We live very far away from Boston, but our thoughts and prayers are with all of those who were there and who have friends and family out there. Our neighbor's son was at the race Monday. He is in Boston serving a mission for our Church. He suffered some minor injuries and we are all very thankful that he was not injured more severely.

Anyway, so after a week and a half of stock making (we had a late, last minute extra carcass to toss in after hubby wanted chicken fingers for dinner Sunday.. so Saturday I spent deboning another chicken...) and some time for the stock to sit in the refrigerator so the fats would solidify.. Today I was able to get everything into bottles and processed for long term storage.
I will walk you through what I did, but, as always, please read the instructions that came with your pressure canner when doing this at home. There may be some differences in processing time due to elevation or whatnot..
First thing I did was to gather all my bottles and run them through the dishwasher. This makes sure they are clean, and, in as much as possible, hot for the canning process. While they are washing, get out your canner and fill it with water to the pressure canning mark. It should be fairly low down, an inch or two from the bottom. Get a small saucepan and fill with water. Your lids will go in this. You will need to have your lids boiled and ready to go.
Fill a large stock pot with your cold stock and bring to a boil. I had 3 large bowls of stock in my fridge, so I couldn't fit it all in at one go, but that is ok, because I was going to have 2 rounds of bottles anyway.
When your dishwasher is just about done, bring all 3 pots to a boil. (The canner you might just want to bring to a simmer, but it will go faster if you've preheated your water... again.. follow the instructions for your canner!!)
When the stock has come to a boil, turn off the heat and fill your bottles. For stocks and soups, the instructions for my canner says to leave a 1 inch head space. When your bottles are filled, run a damp cloth around the edges of the top of the jar to wipe any spills or obstructions that might prevent the lid from sealing. Place your boiled lid on your jar and twist closed with your ring. They just need to be finger tight.
When you have enough jars to fill your canner, do so. Use your jar lifter so as not to burn your fingers and move your jars into the canner.

Place your lid on the canner and wait for the pressure indicator to pop (again, follow your canner's instructions..) place your weights and wait for the rattle and then start your timing. For me, I processed at 10 pounds pressure for 25 minutes for quarts and 20 minutes for pints. I did one batch of each. I got 6 quarts and 7 pints.
When your time is up, turn off the heat and wait. This is the part that takes all the time. You have to wait for the pressure in the canner to slowly dissipate before you do ANYTHING else at this point. Removing the weight or attempting to open the canner at this point could cause an explosion and there could be scalding hot liquid, glass and metal all over your kitchen, so please, JUST LET IT SIT. Wait until the pressure indicator drops and then you can remove the weight. If it is still releasing steam at this point, you might want to wait a little longer. When you do open the lid, keep in mind, things will still be incredibly hot in there and the steam can burn you, so be careful.
Once your lid is open, use your jar lifter to move the jars from the canner to the counter. I always put down a dishcloth or several layers of paper towels, both in my cooling station and in my filling station. It helps cut down the clean up from spills and helps cushion the hot jars and protect the counter top.
Again, you will want to place them and let them be. Let them sit several hours or over night to cool before moving them to your pantry. Always check to make sure they have sealed before moving them and any that don't can either be reheated and reprocessed using a new lid, or tucked into the fridge for immediate use.
First, a note:
I half thought about delaying this post due to the unfortunate happenings in Boston earlier this week. However, in the end, I decided that I would go ahead with this. Pressure canners can be dangerous. It is always very important to read and follow the instructions that come with your canner. But they are very useful tools in the kitchen. The ones used in the bombs in Boston were much smaller cookers then are generally used in home canning.
We live very far away from Boston, but our thoughts and prayers are with all of those who were there and who have friends and family out there. Our neighbor's son was at the race Monday. He is in Boston serving a mission for our Church. He suffered some minor injuries and we are all very thankful that he was not injured more severely.

Anyway, so after a week and a half of stock making (we had a late, last minute extra carcass to toss in after hubby wanted chicken fingers for dinner Sunday.. so Saturday I spent deboning another chicken...) and some time for the stock to sit in the refrigerator so the fats would solidify.. Today I was able to get everything into bottles and processed for long term storage.
I will walk you through what I did, but, as always, please read the instructions that came with your pressure canner when doing this at home. There may be some differences in processing time due to elevation or whatnot..
 |
| 6 quart sized bottles for the first batch.. |
 |
| lids for the first batch |
First thing I did was to gather all my bottles and run them through the dishwasher. This makes sure they are clean, and, in as much as possible, hot for the canning process. While they are washing, get out your canner and fill it with water to the pressure canning mark. It should be fairly low down, an inch or two from the bottom. Get a small saucepan and fill with water. Your lids will go in this. You will need to have your lids boiled and ready to go.
 | |
| bubble bubble... |
Fill a large stock pot with your cold stock and bring to a boil. I had 3 large bowls of stock in my fridge, so I couldn't fit it all in at one go, but that is ok, because I was going to have 2 rounds of bottles anyway.
When your dishwasher is just about done, bring all 3 pots to a boil. (The canner you might just want to bring to a simmer, but it will go faster if you've preheated your water... again.. follow the instructions for your canner!!)
 | |
| bottles all full |
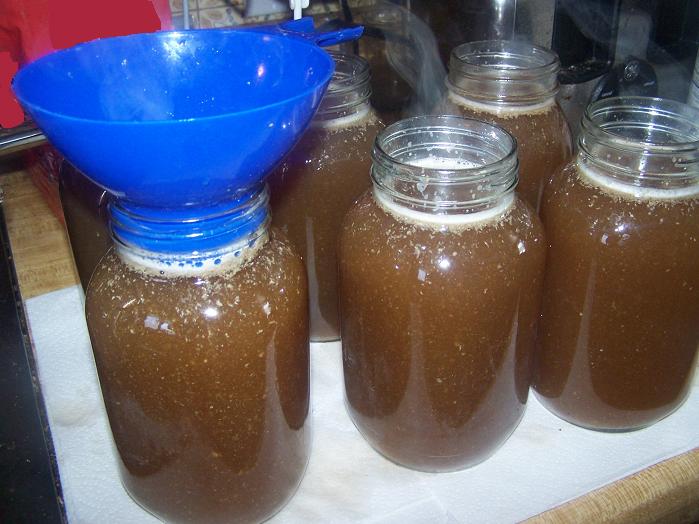
When the stock has come to a boil, turn off the heat and fill your bottles. For stocks and soups, the instructions for my canner says to leave a 1 inch head space. When your bottles are filled, run a damp cloth around the edges of the top of the jar to wipe any spills or obstructions that might prevent the lid from sealing. Place your boiled lid on your jar and twist closed with your ring. They just need to be finger tight.
 |
| into the bath! |
When you have enough jars to fill your canner, do so. Use your jar lifter so as not to burn your fingers and move your jars into the canner.

Place your lid on the canner and wait for the pressure indicator to pop (again, follow your canner's instructions..) place your weights and wait for the rattle and then start your timing. For me, I processed at 10 pounds pressure for 25 minutes for quarts and 20 minutes for pints. I did one batch of each. I got 6 quarts and 7 pints.
When your time is up, turn off the heat and wait. This is the part that takes all the time. You have to wait for the pressure in the canner to slowly dissipate before you do ANYTHING else at this point. Removing the weight or attempting to open the canner at this point could cause an explosion and there could be scalding hot liquid, glass and metal all over your kitchen, so please, JUST LET IT SIT. Wait until the pressure indicator drops and then you can remove the weight. If it is still releasing steam at this point, you might want to wait a little longer. When you do open the lid, keep in mind, things will still be incredibly hot in there and the steam can burn you, so be careful.
 | |
| second batch - 7 pint sized bottles |
Once your lid is open, use your jar lifter to move the jars from the canner to the counter. I always put down a dishcloth or several layers of paper towels, both in my cooling station and in my filling station. It helps cut down the clean up from spills and helps cushion the hot jars and protect the counter top.
Again, you will want to place them and let them be. Let them sit several hours or over night to cool before moving them to your pantry. Always check to make sure they have sealed before moving them and any that don't can either be reheated and reprocessed using a new lid, or tucked into the fridge for immediate use.
 | |
| lots of stock! |
Wednesday, April 10, 2013
Home made Chicken stock - part 1
So, over the last few weeks we've made use of a few chickens. Whenever possible, I save as many of the bones, skin, organs, etc in bag and stick them in the freezer. When I've got enough to fill my slow cooker a few times, I make some stock.
I also save up the odds and ends of veggies for this as well. Carrots, celery, onions, chard, spinach, peppers and the like. About the only thing that doesn't work well for this is potatoes. Potatoes and similar starchy vegetables tend to cloud the stock and we don't want that. Also, you might want to add garlic or other herbs. It's a matter of making stock that _you_ like the flavor of and that works for you and your family.
This isn't a hard and fast recipe by any means. Use what you have, what you like, what you want to "sneak" past your kids (or in my case, husband...) We will be pulling as many of the nutrients out of the foods that are going into the pot as possible and making a nice, rich stock from it.
This is a really easy way to make stock from left overs you would otherwise throw away and really doesn't take up that much of your time. All you really need to do it toss your left over chicken (or turkey) carcass and some veggies into your slow cooker, add some water, set it on low and walk away for 24 hours. Honestly, that's all there is to it.
This batch was a mixture of pre-cooked carcases and raw bits from a bird I'd cut into pieces, so I had the left over necks, back bone, wings and the like.
When you come back 24 hours later, you will have this lovely mess. Here's where the "work" comes in. At this point you need to strain this to separate the solid matter from the lovely stock. I use a strain and sort method so I can pick the bones of any useful bits of now cooked meat that might have stuck to the raw bones, but will just fall right off now. Save those for later use.
I will also use this as a chance to break open a few of the larger bones. We want this lovely marrow to have every chance to escape into the next round of stock.
Bone broth, aka, stock, gets a good deal of it's nutrients from the marrow in the bones. We want to cook them until the bones easily crumble and most of the marrow has escaped into the stock.
(Sorry about the fuzzy picture, my battery was dying..*sigh*)
 Then back into the pot goes the bones, and bits again, as they still have lots to give. I will add in more of the bones from my freezer stock pile and more veggie scraps and run this for 3-4 days until my stock pile is gone and I've gotten pretty much all that I can from the bones.
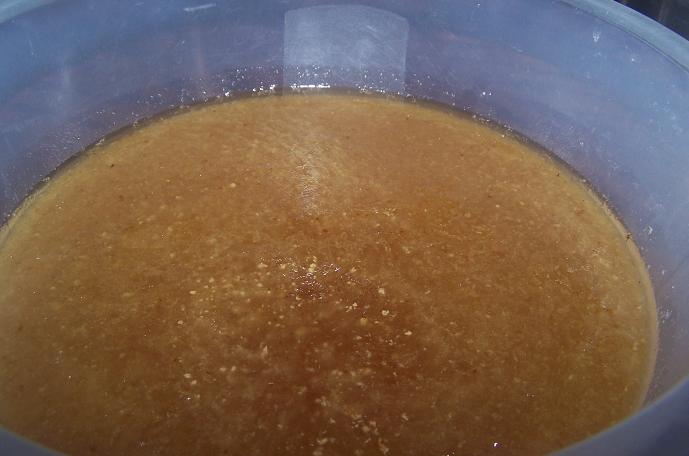
 Here you see round 1 of the stock. There is a nice shimmer of fat on top of this and it is still cloudy from some of the smaller particulates. I plan to use some of the stock I'm making this week for soup, but the bulk of it will most likely be bottled this weekend for long term storage in the pantry. Before bottling, we will want to remove as much of the fat as we can, so this will get covered and go into the refrigerator every night after getting topped off. (I will easily fill this bowl and perhaps another before we're done..)

So, next day we pull this out and before we go about repeating the strain and sort and adding the next round of stock to the bowl, we need to remove the fat. As you can see, it has solidified overnight in the fridge. This makes things much easier as now you can simply use a spoon or a fork and simply lift the fat off the top of the stock in small sections.
Again here, I always save the fat that I skim off my stocks. I use it for all sorts of things from seasoning my cast iron to using it as my saute fat when browning onions, mushrooms or peppers and such, or anytime I'm working with something that could use a little extra fat in the preparation.
That leaves me with this lovely, semi-congealed stock. The natural collagen from the skin and bones will gelatinize the stock while it is refrigerated. From here you can use it as is, freeze it or bottle it for long term storage. I will be doing bottling later in the week and will cover that then, but first, I will be pulling some out for "fresh" use in a soup in order to use up some other left overs:
No pictures, but I had some left over meatballs that I quartered, added some mixed veggies, a can of diced tomatoes and some left over rice. I added a few ladles full of the stock and about a cup of water, along with some herbs and let that all simmer.
Serve with garlic bread and there was dinner.
In part 2, I will show you how I bottle all this goodness up for storage in the pantry.
Also, if you've been to this site before, you might notice a new button off to the side. We want to adopt and could use a little bit of help with some of the finances for it. We had most of the money we would have needed last year before the 2 layoffs and some emergency septic line repair. Now that Hubby is employed again, we're working on building everything back up, but, we would certainly be very grateful if anyone felt impressed to help us along with donations. Adoption is, sadly, not cheap, not easy, and not guaranteed. But it would go a long way if we could get our homestudy paid for and out of the way. We've been quoted a price for the homestudy of around $2000, and, if we're lucky, the entire adoption could be around $10,000, which would be wonderful as many agencies charge 4 or 5 times that, or more. We are also working with the foster care system, so if we get matched through that, things could be much less expensive, but we need that initial home study out of the way so that we can get things moving along. Any contributions would be wonderful. (And I'm not above bribing... or making a deal for some of my home made jams, jellies, pickles, syrups, etc... just saying...)
I also save up the odds and ends of veggies for this as well. Carrots, celery, onions, chard, spinach, peppers and the like. About the only thing that doesn't work well for this is potatoes. Potatoes and similar starchy vegetables tend to cloud the stock and we don't want that. Also, you might want to add garlic or other herbs. It's a matter of making stock that _you_ like the flavor of and that works for you and your family.
This isn't a hard and fast recipe by any means. Use what you have, what you like, what you want to "sneak" past your kids (or in my case, husband...) We will be pulling as many of the nutrients out of the foods that are going into the pot as possible and making a nice, rich stock from it.
 |
| Put this in and wait 24 hours..... |
This batch was a mixture of pre-cooked carcases and raw bits from a bird I'd cut into pieces, so I had the left over necks, back bone, wings and the like.
 |
| And come back to this.... |
When you come back 24 hours later, you will have this lovely mess. Here's where the "work" comes in. At this point you need to strain this to separate the solid matter from the lovely stock. I use a strain and sort method so I can pick the bones of any useful bits of now cooked meat that might have stuck to the raw bones, but will just fall right off now. Save those for later use.
 |
| ooh.. marrow! |
I will also use this as a chance to break open a few of the larger bones. We want this lovely marrow to have every chance to escape into the next round of stock.
Bone broth, aka, stock, gets a good deal of it's nutrients from the marrow in the bones. We want to cook them until the bones easily crumble and most of the marrow has escaped into the stock.
(Sorry about the fuzzy picture, my battery was dying..*sigh*)


So, next day we pull this out and before we go about repeating the strain and sort and adding the next round of stock to the bowl, we need to remove the fat. As you can see, it has solidified overnight in the fridge. This makes things much easier as now you can simply use a spoon or a fork and simply lift the fat off the top of the stock in small sections.
Again here, I always save the fat that I skim off my stocks. I use it for all sorts of things from seasoning my cast iron to using it as my saute fat when browning onions, mushrooms or peppers and such, or anytime I'm working with something that could use a little extra fat in the preparation.
 |
| congealed stock |
No pictures, but I had some left over meatballs that I quartered, added some mixed veggies, a can of diced tomatoes and some left over rice. I added a few ladles full of the stock and about a cup of water, along with some herbs and let that all simmer.
Serve with garlic bread and there was dinner.
In part 2, I will show you how I bottle all this goodness up for storage in the pantry.
Also, if you've been to this site before, you might notice a new button off to the side. We want to adopt and could use a little bit of help with some of the finances for it. We had most of the money we would have needed last year before the 2 layoffs and some emergency septic line repair. Now that Hubby is employed again, we're working on building everything back up, but, we would certainly be very grateful if anyone felt impressed to help us along with donations. Adoption is, sadly, not cheap, not easy, and not guaranteed. But it would go a long way if we could get our homestudy paid for and out of the way. We've been quoted a price for the homestudy of around $2000, and, if we're lucky, the entire adoption could be around $10,000, which would be wonderful as many agencies charge 4 or 5 times that, or more. We are also working with the foster care system, so if we get matched through that, things could be much less expensive, but we need that initial home study out of the way so that we can get things moving along. Any contributions would be wonderful. (And I'm not above bribing... or making a deal for some of my home made jams, jellies, pickles, syrups, etc... just saying...)
Thursday, April 4, 2013
Orange Chicken
Ok, so this is an older recipe that I made a while back and posted for some friends elsewhere. Since there is not much going on right now with money being tight, I thought I would pull it out, brush it off and repost it here. So here you go.
This recipe makes about 2 servings and is really pretty easy to make.

Gluten Free Orange Chicken with Snow Peas
Part 1 is to prepare the chicken
You will need 10 oz of chicken cut into bite sized chunks, salted and peppered. Place seasoned chicken chunks into a warm skillet with some broth in it and cooked it that way until done. If your broth evaporates and it starts to stick, just add a bit more broth.
Part 2 is the sauce
Some of this you might want to do before you start your chicken so it's all ready to go.
You will need:
1/4 c broth
1 Tbsp cornstarch
1 1/2 tbsp low sugar orange marmalade (I just used some from those little gift baskets you always get at the holidays.. no one in our house really likes marmalade, so it kinda accumulates..)
1 1/2 tbsp seasoned rice vinegar (I didn't have seasoned, so just used plain..)
1 tbsp splenda, granulated (or other sugar of your choice.. I used coconut sugar)
1 tbsp low sodium soy sauce (I use the Fred Meyer brand cuz it's gluten free and cheaper, I know La Choy also has a GF low sodium blend.. or other soy type sauce if you don't do soy..coconut aminos are a popular substitute, though I haven't found them up here yet to try them.)
1 tsp chopped garlic
1 tsp chopped ginger (I don't use it often enough right now to have on hand, so i used powdered..)
"dash" of red pepper flakes
2 tbsp chopped scallions/green onions for garnish
So, to make the sauce, you place your broth and corn starch in a medium bowl and whisk to combine until the corn starch has dissolved. Add the marmalade, vinegar, sugar and soy sauce and mix that all in.
Once your chicken has all cooked, remove it from the pan (may have to be cooked in batches) set it aside and add the garlic and fresh ginger to the pan. Add more broth if needed. You want it to just soften and release the flavor and odor. You do not want much broth left in the pan at this point. Once the garlic and ginger is done, add the contents of the sauce bowl and the red pepper flakes. Cook that, occasionally stirring until it starts to thicken. 1-2 minutes
Remove from heat and add the chicken back to the pan. Toss or gently stir to coat and toss with scallions.
I served over rice with steamed snow pea pods on the side.
Notes:
I really did like this. Though I think I over did the red pepper flakes.. it was a bit hot for me, so I opened a can of mandarin oranges and tossed those in as well to add a bit more sweetness to counteract the heat. Will definitely be cutting way down on those in the future.
This certainly gets a thumbs up and I will be making it again, and am considering adding more veggies to it or something maybe as well. I debated breading the chicken, but I'm actually pretty glad I skipped it. It tasted just fine and I really didn't miss it at all.
If you can't have corn, I'm sure that potato or tapioca or one of the other starches would work.
If you can't have the garlic, I'm sure you could just leave that out and still be just fine

Sunday, March 31, 2013
Easter Dinner
Well, I certainly hope everyone has had a wonderful Easter weekend.
We had a quiet day, which is always nice. Hubby took Kikkoman and Petey out for a long (for them) walk in the sunshine (and snow) and they just loved it. Moki was very sad that she didn't get to go, but she will get a turn later. Kikko is really doing very well off leash and Hubby was happy to report that, even with the distraction of several other dogs and kids, he listened well and, eventually, did as he was told. So, yay there..
Teenager went over to her sister's yesterday, which is at least part of why our weekend has been so quiet. :) She is over there getting use to the newest member of her sister's family.. Ruby, a baby pot bellied pig. Very cute little thing, but she is very young and is still learning what she is and is not allowed to do.
We're still waiting for Hubby's unemployment to end. There is possible hope being dangled in front of us right now, and in many ways, that is much worse then the not knowing anything at all. But I have a really good feeling about this week.

Anyway, for our "Big Easter Feast" I always make a roasted chicken. This year Hubby requested a BBQ chicken, so to tie into that theme I made a pickled potato salad, corn on the cob, bread sticks and (for hubby..) pop biscuits, pickled deviled eggs and a blueberry lemon dump cake. I will also be pulling out some pickled beets from the pantry.

And not on to the recipes:
BBQ Roast Chicken

1 5 lb whole chicken
1/4 a medium onion roughly chopped
Your favorite bbq sauce. I used a hickory one
1/2 c water
Place chicken in your roasting pan.
Insert chopped onion into cavity. Slather with bbq sauce. Make it as
messy as you like. Add 1/2 c water to the bottom of the pan. Cover and
let roast for @ 1 and a half hours until chicken is done and juices run clear. Carve as desired and move to serving plate.

Bread sticks
I so cheated this one the most by far.
I used a package of Arrowhead Mills pizza crust mix and followed the instructions on
the back for making bread sticks instead of pizza crust. I coated with olive oil dded a little salt and some parma.
(Pictured on plate above.)
Davina's Pickled Potato Salad

5 small to medium potatoes, diced,
boiled and drained
1 pint bottle pickled potatoes or
turnips, drained
½ medium onion, diced
4 hard boiled eggs, diced
3 dill pickles (or 7 baby pickles)
diced
4 stalks celery, diced (optional)
4-5 cloves pickled garlic, diced (or
“plain” diced garlic)
salt and pepper to taste
mustard, regular and/or spicy
mayonnaise
 So after boiling potatoes and eggs and
allowing to cool, dice everything as finely or roughly as you'd like
and combine everything into a large bowl. Mix to combine. Make this
with spicey mustard and even horseradish if you'd like, or leave it
mild and mellow. Add in some dill or other herbs.
So after boiling potatoes and eggs and
allowing to cool, dice everything as finely or roughly as you'd like
and combine everything into a large bowl. Mix to combine. Make this
with spicey mustard and even horseradish if you'd like, or leave it
mild and mellow. Add in some dill or other herbs.
Let refrigerate over night for best
results.
Red and Yellow Pickled Deviled Eggs

I took the eggs out of the pickle juice and out of the pickled beet juice, sliced in half and harvested the yolks. To the yolks I added some mayo, a little bit of pickle juice and some dill. Return mixture to eggs and top with additional dill.

Roasted Corn on the Cob

Shuck your corn getting all husks and hair removed. Place on a piece of tinfoil large enough to wrap your corn. Add butter and any seasonings you'd like. (We usually add a smidge of salt, some pepper and a little garlic) Wrap securely in foil and place in oven at 350 for about 20 minutes.
I realized after dinner that I forgot to put corn on the plate before taking pictures.. Actually, we forgot to even put it on the table. opps.. But we were all so full without it, we really didn't mind, and it means we'll have it for later! (Hubby is an Indiana boy, so he could sit and eat corn all day if I'd let him... of course, I'm a mix of Idaho and Nebraska so I'd likely join him, though I'd stop for tators once in a while.. hehee)
So here is what the finished corn looked like:

Lemon Blueberry Dump Cake

Mix cake mix according to package
directions, adding a wee bit of lemon extract. Add more or less
depending on how lemony you want your cake.
Pour into greased cake pan and add
dollops of blueberry pie filling throughout the cake. Bake according
to directions. You may need to add some additional bake time to allow
for the pie filling. Allow to cool and serve with whipped cream or
cool whip.

Now, I also made some pop biscuits for Hubby and the Teen. I pretty much did this just so I could try making those silly biscuit bunnies that have been all over Facebook this past few weeks. so glad we didn't have super high expectations.

Here's what they looked like going into the oven...

And this is what they looked like when they were done. We decided they looked more like deranged and angry cats then bunnies. Oh well.
Subscribe to:
Posts (Atom)