Due to a friend's family emergency, things around here might be a bit slower then usual.. One of my neighbor's has to go out of state to help her parents recover from some medical issues. Taking her kids would have made things very complicated, so I will be watching them during the day while their dad is at work. So I'm going to be a bit busy and might not have much time to play with recipes.. If I come up with anything at all interesting, I will do what I can to get it posted. Mostly we tend to eat enchilada casserole, nachos, pasta, rice and whatever... fairly basic stuff...
Will keep you posted as things happen :)
Tuesday, April 23, 2013
Thursday, April 18, 2013
Chicken Stock - part 2: The Canning
Ok, technically it's bottling, but that's a semantic issue...
First, a note:
I half thought about delaying this post due to the unfortunate happenings in Boston earlier this week. However, in the end, I decided that I would go ahead with this. Pressure canners can be dangerous. It is always very important to read and follow the instructions that come with your canner. But they are very useful tools in the kitchen. The ones used in the bombs in Boston were much smaller cookers then are generally used in home canning.
We live very far away from Boston, but our thoughts and prayers are with all of those who were there and who have friends and family out there. Our neighbor's son was at the race Monday. He is in Boston serving a mission for our Church. He suffered some minor injuries and we are all very thankful that he was not injured more severely.

Anyway, so after a week and a half of stock making (we had a late, last minute extra carcass to toss in after hubby wanted chicken fingers for dinner Sunday.. so Saturday I spent deboning another chicken...) and some time for the stock to sit in the refrigerator so the fats would solidify.. Today I was able to get everything into bottles and processed for long term storage.
I will walk you through what I did, but, as always, please read the instructions that came with your pressure canner when doing this at home. There may be some differences in processing time due to elevation or whatnot..
First thing I did was to gather all my bottles and run them through the dishwasher. This makes sure they are clean, and, in as much as possible, hot for the canning process. While they are washing, get out your canner and fill it with water to the pressure canning mark. It should be fairly low down, an inch or two from the bottom. Get a small saucepan and fill with water. Your lids will go in this. You will need to have your lids boiled and ready to go.
Fill a large stock pot with your cold stock and bring to a boil. I had 3 large bowls of stock in my fridge, so I couldn't fit it all in at one go, but that is ok, because I was going to have 2 rounds of bottles anyway.
When your dishwasher is just about done, bring all 3 pots to a boil. (The canner you might just want to bring to a simmer, but it will go faster if you've preheated your water... again.. follow the instructions for your canner!!)
When the stock has come to a boil, turn off the heat and fill your bottles. For stocks and soups, the instructions for my canner says to leave a 1 inch head space. When your bottles are filled, run a damp cloth around the edges of the top of the jar to wipe any spills or obstructions that might prevent the lid from sealing. Place your boiled lid on your jar and twist closed with your ring. They just need to be finger tight.
When you have enough jars to fill your canner, do so. Use your jar lifter so as not to burn your fingers and move your jars into the canner.

Place your lid on the canner and wait for the pressure indicator to pop (again, follow your canner's instructions..) place your weights and wait for the rattle and then start your timing. For me, I processed at 10 pounds pressure for 25 minutes for quarts and 20 minutes for pints. I did one batch of each. I got 6 quarts and 7 pints.
When your time is up, turn off the heat and wait. This is the part that takes all the time. You have to wait for the pressure in the canner to slowly dissipate before you do ANYTHING else at this point. Removing the weight or attempting to open the canner at this point could cause an explosion and there could be scalding hot liquid, glass and metal all over your kitchen, so please, JUST LET IT SIT. Wait until the pressure indicator drops and then you can remove the weight. If it is still releasing steam at this point, you might want to wait a little longer. When you do open the lid, keep in mind, things will still be incredibly hot in there and the steam can burn you, so be careful.
Once your lid is open, use your jar lifter to move the jars from the canner to the counter. I always put down a dishcloth or several layers of paper towels, both in my cooling station and in my filling station. It helps cut down the clean up from spills and helps cushion the hot jars and protect the counter top.
Again, you will want to place them and let them be. Let them sit several hours or over night to cool before moving them to your pantry. Always check to make sure they have sealed before moving them and any that don't can either be reheated and reprocessed using a new lid, or tucked into the fridge for immediate use.
First, a note:
I half thought about delaying this post due to the unfortunate happenings in Boston earlier this week. However, in the end, I decided that I would go ahead with this. Pressure canners can be dangerous. It is always very important to read and follow the instructions that come with your canner. But they are very useful tools in the kitchen. The ones used in the bombs in Boston were much smaller cookers then are generally used in home canning.
We live very far away from Boston, but our thoughts and prayers are with all of those who were there and who have friends and family out there. Our neighbor's son was at the race Monday. He is in Boston serving a mission for our Church. He suffered some minor injuries and we are all very thankful that he was not injured more severely.

Anyway, so after a week and a half of stock making (we had a late, last minute extra carcass to toss in after hubby wanted chicken fingers for dinner Sunday.. so Saturday I spent deboning another chicken...) and some time for the stock to sit in the refrigerator so the fats would solidify.. Today I was able to get everything into bottles and processed for long term storage.
I will walk you through what I did, but, as always, please read the instructions that came with your pressure canner when doing this at home. There may be some differences in processing time due to elevation or whatnot..
 |
| 6 quart sized bottles for the first batch.. |
 |
| lids for the first batch |
First thing I did was to gather all my bottles and run them through the dishwasher. This makes sure they are clean, and, in as much as possible, hot for the canning process. While they are washing, get out your canner and fill it with water to the pressure canning mark. It should be fairly low down, an inch or two from the bottom. Get a small saucepan and fill with water. Your lids will go in this. You will need to have your lids boiled and ready to go.
 | |
| bubble bubble... |
Fill a large stock pot with your cold stock and bring to a boil. I had 3 large bowls of stock in my fridge, so I couldn't fit it all in at one go, but that is ok, because I was going to have 2 rounds of bottles anyway.
When your dishwasher is just about done, bring all 3 pots to a boil. (The canner you might just want to bring to a simmer, but it will go faster if you've preheated your water... again.. follow the instructions for your canner!!)
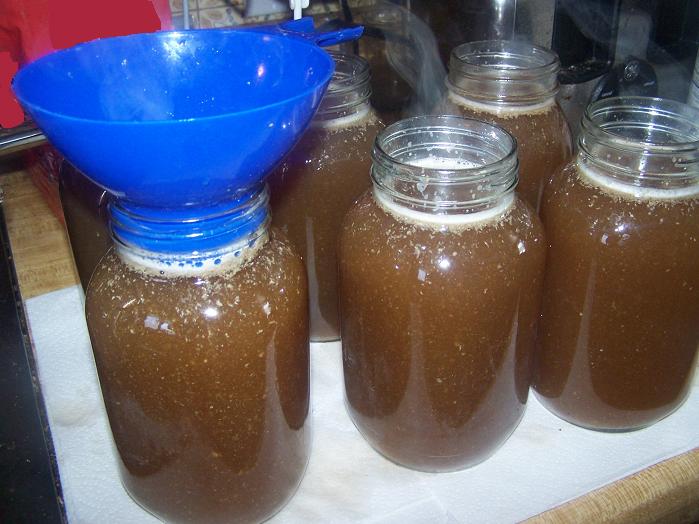 | |
| bottles all full |
When the stock has come to a boil, turn off the heat and fill your bottles. For stocks and soups, the instructions for my canner says to leave a 1 inch head space. When your bottles are filled, run a damp cloth around the edges of the top of the jar to wipe any spills or obstructions that might prevent the lid from sealing. Place your boiled lid on your jar and twist closed with your ring. They just need to be finger tight.
 |
| into the bath! |
When you have enough jars to fill your canner, do so. Use your jar lifter so as not to burn your fingers and move your jars into the canner.

Place your lid on the canner and wait for the pressure indicator to pop (again, follow your canner's instructions..) place your weights and wait for the rattle and then start your timing. For me, I processed at 10 pounds pressure for 25 minutes for quarts and 20 minutes for pints. I did one batch of each. I got 6 quarts and 7 pints.
When your time is up, turn off the heat and wait. This is the part that takes all the time. You have to wait for the pressure in the canner to slowly dissipate before you do ANYTHING else at this point. Removing the weight or attempting to open the canner at this point could cause an explosion and there could be scalding hot liquid, glass and metal all over your kitchen, so please, JUST LET IT SIT. Wait until the pressure indicator drops and then you can remove the weight. If it is still releasing steam at this point, you might want to wait a little longer. When you do open the lid, keep in mind, things will still be incredibly hot in there and the steam can burn you, so be careful.
 | |
| second batch - 7 pint sized bottles |
Once your lid is open, use your jar lifter to move the jars from the canner to the counter. I always put down a dishcloth or several layers of paper towels, both in my cooling station and in my filling station. It helps cut down the clean up from spills and helps cushion the hot jars and protect the counter top.
Again, you will want to place them and let them be. Let them sit several hours or over night to cool before moving them to your pantry. Always check to make sure they have sealed before moving them and any that don't can either be reheated and reprocessed using a new lid, or tucked into the fridge for immediate use.
 | |
| lots of stock! |
Wednesday, April 10, 2013
Home made Chicken stock - part 1
So, over the last few weeks we've made use of a few chickens. Whenever possible, I save as many of the bones, skin, organs, etc in bag and stick them in the freezer. When I've got enough to fill my slow cooker a few times, I make some stock.
I also save up the odds and ends of veggies for this as well. Carrots, celery, onions, chard, spinach, peppers and the like. About the only thing that doesn't work well for this is potatoes. Potatoes and similar starchy vegetables tend to cloud the stock and we don't want that. Also, you might want to add garlic or other herbs. It's a matter of making stock that _you_ like the flavor of and that works for you and your family.
This isn't a hard and fast recipe by any means. Use what you have, what you like, what you want to "sneak" past your kids (or in my case, husband...) We will be pulling as many of the nutrients out of the foods that are going into the pot as possible and making a nice, rich stock from it.
This is a really easy way to make stock from left overs you would otherwise throw away and really doesn't take up that much of your time. All you really need to do it toss your left over chicken (or turkey) carcass and some veggies into your slow cooker, add some water, set it on low and walk away for 24 hours. Honestly, that's all there is to it.
This batch was a mixture of pre-cooked carcases and raw bits from a bird I'd cut into pieces, so I had the left over necks, back bone, wings and the like.
When you come back 24 hours later, you will have this lovely mess. Here's where the "work" comes in. At this point you need to strain this to separate the solid matter from the lovely stock. I use a strain and sort method so I can pick the bones of any useful bits of now cooked meat that might have stuck to the raw bones, but will just fall right off now. Save those for later use.
I will also use this as a chance to break open a few of the larger bones. We want this lovely marrow to have every chance to escape into the next round of stock.
Bone broth, aka, stock, gets a good deal of it's nutrients from the marrow in the bones. We want to cook them until the bones easily crumble and most of the marrow has escaped into the stock.
(Sorry about the fuzzy picture, my battery was dying..*sigh*)
 Then back into the pot goes the bones, and bits again, as they still have lots to give. I will add in more of the bones from my freezer stock pile and more veggie scraps and run this for 3-4 days until my stock pile is gone and I've gotten pretty much all that I can from the bones.
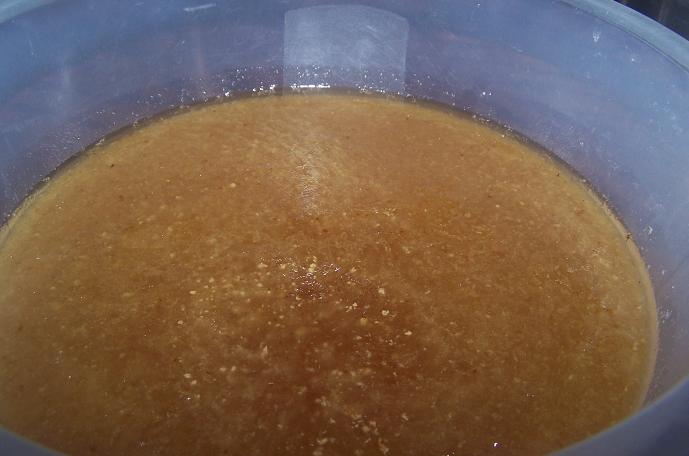
 Here you see round 1 of the stock. There is a nice shimmer of fat on top of this and it is still cloudy from some of the smaller particulates. I plan to use some of the stock I'm making this week for soup, but the bulk of it will most likely be bottled this weekend for long term storage in the pantry. Before bottling, we will want to remove as much of the fat as we can, so this will get covered and go into the refrigerator every night after getting topped off. (I will easily fill this bowl and perhaps another before we're done..)

So, next day we pull this out and before we go about repeating the strain and sort and adding the next round of stock to the bowl, we need to remove the fat. As you can see, it has solidified overnight in the fridge. This makes things much easier as now you can simply use a spoon or a fork and simply lift the fat off the top of the stock in small sections.
Again here, I always save the fat that I skim off my stocks. I use it for all sorts of things from seasoning my cast iron to using it as my saute fat when browning onions, mushrooms or peppers and such, or anytime I'm working with something that could use a little extra fat in the preparation.
That leaves me with this lovely, semi-congealed stock. The natural collagen from the skin and bones will gelatinize the stock while it is refrigerated. From here you can use it as is, freeze it or bottle it for long term storage. I will be doing bottling later in the week and will cover that then, but first, I will be pulling some out for "fresh" use in a soup in order to use up some other left overs:
No pictures, but I had some left over meatballs that I quartered, added some mixed veggies, a can of diced tomatoes and some left over rice. I added a few ladles full of the stock and about a cup of water, along with some herbs and let that all simmer.
Serve with garlic bread and there was dinner.
In part 2, I will show you how I bottle all this goodness up for storage in the pantry.
Also, if you've been to this site before, you might notice a new button off to the side. We want to adopt and could use a little bit of help with some of the finances for it. We had most of the money we would have needed last year before the 2 layoffs and some emergency septic line repair. Now that Hubby is employed again, we're working on building everything back up, but, we would certainly be very grateful if anyone felt impressed to help us along with donations. Adoption is, sadly, not cheap, not easy, and not guaranteed. But it would go a long way if we could get our homestudy paid for and out of the way. We've been quoted a price for the homestudy of around $2000, and, if we're lucky, the entire adoption could be around $10,000, which would be wonderful as many agencies charge 4 or 5 times that, or more. We are also working with the foster care system, so if we get matched through that, things could be much less expensive, but we need that initial home study out of the way so that we can get things moving along. Any contributions would be wonderful. (And I'm not above bribing... or making a deal for some of my home made jams, jellies, pickles, syrups, etc... just saying...)
I also save up the odds and ends of veggies for this as well. Carrots, celery, onions, chard, spinach, peppers and the like. About the only thing that doesn't work well for this is potatoes. Potatoes and similar starchy vegetables tend to cloud the stock and we don't want that. Also, you might want to add garlic or other herbs. It's a matter of making stock that _you_ like the flavor of and that works for you and your family.
This isn't a hard and fast recipe by any means. Use what you have, what you like, what you want to "sneak" past your kids (or in my case, husband...) We will be pulling as many of the nutrients out of the foods that are going into the pot as possible and making a nice, rich stock from it.
 |
| Put this in and wait 24 hours..... |
This batch was a mixture of pre-cooked carcases and raw bits from a bird I'd cut into pieces, so I had the left over necks, back bone, wings and the like.
 |
| And come back to this.... |
When you come back 24 hours later, you will have this lovely mess. Here's where the "work" comes in. At this point you need to strain this to separate the solid matter from the lovely stock. I use a strain and sort method so I can pick the bones of any useful bits of now cooked meat that might have stuck to the raw bones, but will just fall right off now. Save those for later use.
 |
| ooh.. marrow! |
I will also use this as a chance to break open a few of the larger bones. We want this lovely marrow to have every chance to escape into the next round of stock.
Bone broth, aka, stock, gets a good deal of it's nutrients from the marrow in the bones. We want to cook them until the bones easily crumble and most of the marrow has escaped into the stock.
(Sorry about the fuzzy picture, my battery was dying..*sigh*)


So, next day we pull this out and before we go about repeating the strain and sort and adding the next round of stock to the bowl, we need to remove the fat. As you can see, it has solidified overnight in the fridge. This makes things much easier as now you can simply use a spoon or a fork and simply lift the fat off the top of the stock in small sections.
Again here, I always save the fat that I skim off my stocks. I use it for all sorts of things from seasoning my cast iron to using it as my saute fat when browning onions, mushrooms or peppers and such, or anytime I'm working with something that could use a little extra fat in the preparation.
 |
| congealed stock |
No pictures, but I had some left over meatballs that I quartered, added some mixed veggies, a can of diced tomatoes and some left over rice. I added a few ladles full of the stock and about a cup of water, along with some herbs and let that all simmer.
Serve with garlic bread and there was dinner.
In part 2, I will show you how I bottle all this goodness up for storage in the pantry.
Also, if you've been to this site before, you might notice a new button off to the side. We want to adopt and could use a little bit of help with some of the finances for it. We had most of the money we would have needed last year before the 2 layoffs and some emergency septic line repair. Now that Hubby is employed again, we're working on building everything back up, but, we would certainly be very grateful if anyone felt impressed to help us along with donations. Adoption is, sadly, not cheap, not easy, and not guaranteed. But it would go a long way if we could get our homestudy paid for and out of the way. We've been quoted a price for the homestudy of around $2000, and, if we're lucky, the entire adoption could be around $10,000, which would be wonderful as many agencies charge 4 or 5 times that, or more. We are also working with the foster care system, so if we get matched through that, things could be much less expensive, but we need that initial home study out of the way so that we can get things moving along. Any contributions would be wonderful. (And I'm not above bribing... or making a deal for some of my home made jams, jellies, pickles, syrups, etc... just saying...)
Thursday, April 4, 2013
Orange Chicken
Ok, so this is an older recipe that I made a while back and posted for some friends elsewhere. Since there is not much going on right now with money being tight, I thought I would pull it out, brush it off and repost it here. So here you go.
This recipe makes about 2 servings and is really pretty easy to make.

Gluten Free Orange Chicken with Snow Peas
Part 1 is to prepare the chicken
You will need 10 oz of chicken cut into bite sized chunks, salted and peppered. Place seasoned chicken chunks into a warm skillet with some broth in it and cooked it that way until done. If your broth evaporates and it starts to stick, just add a bit more broth.
Part 2 is the sauce
Some of this you might want to do before you start your chicken so it's all ready to go.
You will need:
1/4 c broth
1 Tbsp cornstarch
1 1/2 tbsp low sugar orange marmalade (I just used some from those little gift baskets you always get at the holidays.. no one in our house really likes marmalade, so it kinda accumulates..)
1 1/2 tbsp seasoned rice vinegar (I didn't have seasoned, so just used plain..)
1 tbsp splenda, granulated (or other sugar of your choice.. I used coconut sugar)
1 tbsp low sodium soy sauce (I use the Fred Meyer brand cuz it's gluten free and cheaper, I know La Choy also has a GF low sodium blend.. or other soy type sauce if you don't do soy..coconut aminos are a popular substitute, though I haven't found them up here yet to try them.)
1 tsp chopped garlic
1 tsp chopped ginger (I don't use it often enough right now to have on hand, so i used powdered..)
"dash" of red pepper flakes
2 tbsp chopped scallions/green onions for garnish
So, to make the sauce, you place your broth and corn starch in a medium bowl and whisk to combine until the corn starch has dissolved. Add the marmalade, vinegar, sugar and soy sauce and mix that all in.
Once your chicken has all cooked, remove it from the pan (may have to be cooked in batches) set it aside and add the garlic and fresh ginger to the pan. Add more broth if needed. You want it to just soften and release the flavor and odor. You do not want much broth left in the pan at this point. Once the garlic and ginger is done, add the contents of the sauce bowl and the red pepper flakes. Cook that, occasionally stirring until it starts to thicken. 1-2 minutes
Remove from heat and add the chicken back to the pan. Toss or gently stir to coat and toss with scallions.
I served over rice with steamed snow pea pods on the side.
Notes:
I really did like this. Though I think I over did the red pepper flakes.. it was a bit hot for me, so I opened a can of mandarin oranges and tossed those in as well to add a bit more sweetness to counteract the heat. Will definitely be cutting way down on those in the future.
This certainly gets a thumbs up and I will be making it again, and am considering adding more veggies to it or something maybe as well. I debated breading the chicken, but I'm actually pretty glad I skipped it. It tasted just fine and I really didn't miss it at all.
If you can't have corn, I'm sure that potato or tapioca or one of the other starches would work.
If you can't have the garlic, I'm sure you could just leave that out and still be just fine

Subscribe to:
Posts (Atom)